• About Me

The Chronic Illness Warriors

~ Let's take this journey together. You are not invisible. Only your illness is.

The Chronic Illness Warriors

Category Archives: Recipes

RECIPE: Christmas Cookie Sugar Scrub

25 Friday Nov 2016

Posted by Cassandra Carr in Recipes

≈ Leave a comment

RECIPE: Christmas Cookie Sugar Scrub

christmas-cookie-scrub

NOTE: I originally found this recipe on http://www.sparklesofsunshine.com/christmas-cookie-sugar-scrub/

Here is what you will need for this sugar scrub recipe:

  • 1 cup white sugar
  • 1/4 cup coconut oil (if you don’t like the smell of coconut – I can’t stand it – just use a different oil)
  • 1/4 cup grapeseed oil
  • 1 tsp ginger
  • 1/2 tsp cinnamon
  • 1/2 tsp almond extract
  • 1/2 tsp vanilla extract
  • container for storage

This scrub is so easy to make because all you have to do is stir up the ingredients, pour into an airtight container, dress it up with some pretty ribbon and you’re done.

42099_35

RECIPE: Pain Relief Tea

17 Thursday Nov 2016

Posted by Cassandra Carr in Recipes

≈ 1 Comment

Pain Relief Tea

Source: http://www.myfibromyalgiadiet.com/2014/12/26/pain-relief-tea-fibromyalgia-pain-inflammation/

Serves 4

Vegan – Gluten Free – Grain Free – Detox – Paleo

pain-relief-tea-for-fibromyalgia-300x239

Active ingredients:

Turmeric–  Is a natural anti-inflammatory due to its content of curcumin (this gives turmeric its famous orange color). In numerous studies, curcumin’s anti-inflammatory effects have been shown to be comparable to the potent drugs hydrocortisone and phenylbutazone as well as over-the-counter anti-inflammatory agents such as Motrin. Unlike the drugs, which are associated with significant toxic effects (ulcer formation, decreased white blood cell count, intestinal bleeding), curcumin produces no toxicity.*  Turmeric may also benefit your digestive system by stimulating your gall bladder to make bile, speeding breakdown of dietary fats.*

Ginger– Modern scientific research has revealed that ginger possesses numerous therapeutic properties including antioxidant effects, an ability to inhibit formation of inflammatory compounds, and direct anti-inflammatory effects. Ginger has also been shown to aid in gastrointestinal issues and very effective in aiding the symptoms of nausea, motion sickness, and sea sickness. *

Cayenne – Gets its heat from large concentrations of a substance called capsaicin. Capsaicin has been widely studied for its pain-reducing effects, its cardiovascular benefits, and its ability to help prevent ulcers. Capsaicin also effectively opens and drains congested nasal passages.

Lemon– An excellent source of vitamin C which not only helps strength the immune system but it also neutralizes free radicals in the body. Free radicals can interact with the healthy cells of the body, damaging them and their membranes, and cause a lot of inflammation, or painful swelling, in the body.*

Black pepper– Due to its analgesic (pain relieving), anti-inflammatory, and anti-spasmodic properties black pepper has been shown to aid with poor muscle tone, arthritis, muscle and/or nerve pain. The oils in the black pepper has these properties which is why I strongly suggest you use freshly ground or buy black pepper essential oil. 

Both ginger and turmeric are generally considered safe and without significant side effects, and both are available as capsules from health-food stores. However, each may interact with certain prescription medications, and neither should be taken if you are pregnant. Always check with your physician if you ever have any concerns about adding a new food or supplement. 

Ingredients

  1. 40 oz filtered clean water (about 5 cups)
  2. 4 – 1” coins of ginger (or use 1 Tbl powdered ginger)
  3. 1 Tbl + 1 tsp Powdered Turmeric (organic high quality if you can)
  4. 10 turns Freshly Ground Black Pepper
  5. 1/4 tsp Cayenne Pepper
  6. 1 Lemon
  7. 1-2 Tbl Maple Syrup or Raw Honey to taste (see note)

Instructions

    1. Pour the water into a large sauce pan.
    2. Squeeze the lemon into the water and place the squeezed lemons into the pan too.
    3. Add the remaining ingredients and warm over medium heat until it comes to a boil.
    4. Whisk to combine the spices.
    5. Remove from the heat. (This can be left overnight to infuse further with the ginger too)
    6. Strain into mugs and stir in raw honey or maple syrup to taste.
    7. Keep stirring while drinking this because the spices will settle to the bottom.

You can also stir the spices together and pour hot water over while whisking for a quicker version without the ginger. (see notes below)

Adding raw local honey will make this a great immunity boosting drink. Feel free to add your sweetener of choice according to your taste.

If you need a quick single serving
  1. Mix 1 heaping tsp of turmeric, pinch of cayenne, three turns of black pepper, 1/2 tsp powdered ginger (optional but recommended) and pour hot water over while whisking to combine. Squeeze half of a lemon and drink immediately

Sources/References

  • University of Maryland Medical Center: Ginger
  • pinterest.com/pin/405324035186504259/
  • transformyourfood.com/2014/02/19/pain-relief-tea-for-aches-pain-and-inflammation/
  • University of Maryland Medical Center: Turmeric
  • Memorial Sloan-Kettering Cancer Center: Ginger
  • Memorial Sloan-Kettering Cancer Center: Turmeric
  • http://www.whfoods.com/genpage.php?tname=foodspice&dbid=78
  • http://www.whfoods.com/genpage.php?tname=foodspice&dbid=27


39221_104

RECIPE: Three Smoothies to Remember

20 Thursday Oct 2016

Posted by Cassandra Carr in Recipes

≈ Leave a comment

RECIPE: Three Smoothies to Remember

13ad3992ebca36eec04eb28add0ea64f

These are three basic smoothie recipes, but they cover a lot of distance, so to speak. Everyone can use a brain boost…and an immunity boost…and a great green smoothie! I’d omit the coconut water from these recipes, but that’s just me and my abhorrence of all things coconut.

Tons of smoothie recipe exist – any search on Pinterest makes that fact clear. With all these recipes to wade through, it’s nice to have three in one place. My smoothie Pinterest board has hundreds and hundreds of smoothie recipes, and sometimes it’s just too much to try to find one. The brain booster will come in handy as I write my latest work in progress. 😉


40645_104

RECIPE: All-Purpose Citrus Vinegar Cleaners

15 Saturday Oct 2016

Posted by Cassandra Carr in Recipes

≈ Leave a comment

RECIPE: All-Purpose Citrus Vinegar Cleaners

0b930ff43cf1dfff3771577477ae9ef9

Found on the Yummy Life blog:

Did you know? According to the Environmental Protection Agency, indoor air can be 10 times to 100 times more polluted than outdoor air. One of the culprits is common household cleaners emitting toxic fumes.

Vinegar is a wonderful and cheap product to use for all things cleaning. About the only thing I don’t like about it is…you guessed it…the smell. But I have a solution! Add citrus fruits and/or essential oils so the scent of those helps mitigate that strong vinegar odor.

Citrus rinds, in addition to helping with the scent of the cleaner, also lend oils that help the cleaner be more effective. Also, a very important note: you SHOULD NOT use any cleaner containing vinegar on porous surfaces like granite countertops.

5386

Don’t go out and buy citrus fruit just for these cleaners. Eat the fruit, which is good for you, and then recycle the rinds as part of these recipes. Also, you can freeze citrus peels, spices, etc until you have enough of what you need. That helps eliminate the potential waste in your kitchen. Recycle! Reuse!

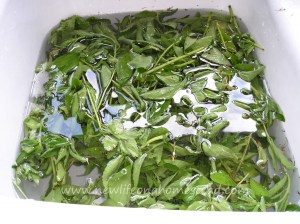
When peeling the citrus, use only use the peel & pith, not the juice & pulp inside.

5389

Cleaner #1: Orange Spice
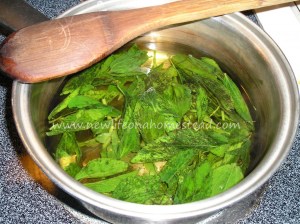
Add cinnamon sticks, whole cloves, and almond extract to a jar or lidded container. Fill with orange peels. Add enough vinegar to cover the peels. Put the lid on and let it sit for 2 weeks (or up to 1 month). I like to label my lid with the exact ingredients I used. That way I will know how to replicate or tweak the formula to my liking in the future. I use blue painters tape for labeling–it sticks well yet removes easily without leaving behind a gummy residue.

5391

Cleaner #2: Lemon Rosemary
Lemon peels, rosemary sprigs, & vanilla extract. Same procedure as above.

5392

Cleaner #3: Lime Thyme
Lime peels and thyme sprigs. Same procedure as above.

5393

Cleaner #4: Grapefruit Mint
Grapefruit peels and mint sprigs (or substitute mint extract or essential oil). Same procedure as above.

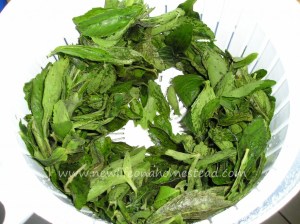
Strain the scented vinegar.
After at least two weeks of soaking time, use either of these methods:

  • Put a funnel in the jar and then rest a wire strainer in the funnel. Pour the vinegar solution through the strainer.
  • Screw a strainer lid onto the top of the jar and pour it through the funnel into the jar.

5394

Store the strained, scented vinegar in a sealed jar or container. Be sure to label it, especially if you’re making more than one kind. It should be good to use for up to a year. This is a concentrate that should be diluted with water before using it.

Dilute and add more scent, if needed.

  • Pour some of the concentrated scented vinegar into a spray bottle. Add 1/3 cup scented vinegar to 2/3 cups of water. I’m using a 16 oz. (2 cup) spray bottle here, so I used 2/3 cups scented vinegar and 1 1/3 cups water.
  • Put the nozzle on the spray bottle and give it a shake. Spray a small amount and smell. Keeping in mind that the vinegar scent will fade once the cleaner dries, if the vinegar smell is still too strong for you, add 1/2 to 1 teaspoon of extract or 4-5 drops of essential oil. For example, I added 4 drops of orange essential oil to mine to intensify the orange scent and increase its cleaning power.

5398

ALL-PURPOSE. I use this natural cleaner on everything except my granite countertops.

  • Wood. For dusting wood furniture, mist a cloth or duster lightly with the scented vinegar mixture. A little goes a long way. It’s great for cleaning wood floors, too.
  • Stainless steel & appliances. It cuts grease and leaves a shine. I spray it directly on my appliances and sink and wipe with a microfiber cloth or sponge.
  • Glass. This does an amazing job on mirrors, glass, and even eye glasses. If you’ve been using Windex type glass cleaner, you may need to add a few drops of liquid dish detergent to your spray bottle to help remove the film left behind from the Windex. After a few cleanings, the liquid detergent won’t be necessary. (Tip from Ron and Lisa Beresin their informative book Let’s Green It!)

You can find citrus essential oils here if you choose to use them. Other ingredients you might need: cinnamon sticks, cloves, Mason (or in this case, Ball) jars, glass spray bottles – healthier than plastic, funnels, small strainer.

40202_44

RECIPE: Pumpkin Breakfast Bread

13 Thursday Oct 2016

Posted by Cassandra Carr in Recipes

≈ Leave a comment

RECIPE: Pumpkin Breakfast Bread


Breakfast is important for chronic illness warriors. Many of us follow a Paleo diet, and eggs can be pretty boring when they’re the foundation of breakfast. This bread is Paleo and grain-free.

3d289f6ab4b33567fedd812edf4349db

260-Calorie 2-Minute Paleo Pumpkin Microwave Muffins

Calories: 260 calories
Fat: 17 grams
Carbs: 22 grams
Protein: 11 grams

Ingredients
* 1 egg
* 1/3 cup pumpkin puree
* 3 tablespoon ground flaxseed meal
* 1 1/2 teaspoon honey
* 1 teaspoon coconut oil
* 1/2 teaspoon pumpkin pie spice (dash each of cinnamon, nutmeg, ginger, cloves)

Directions
1. Break egg into large microwave-safe coffee mug. Gently beat with fork.
2. Mix in pumpkin puree, honey, coconut oil, pumpkin pie spice, and flaxseed meal.
3. Microwave on high for two minutes, but watch to make sure your muffin doesn’t rise over the top of your mug.
4. Either eat your muffin out of the mug, or flip it over on a small plate and sprinkle some extra cinnamon on top.

You’ll notice these say two minute, microwave. What could be better than that?

41810_17


RECIPE: Gluten-free healthy blueberry muffins

06 Thursday Oct 2016

Posted by Cassandra Carr in Recipes

≈ Leave a comment

RECIPE: Gluten-free healthy blueberry muffins

blueberry-muffin-graded-bright-2797


Note: This recipe was originally printed on The Healthy Chef.

Is there anyone out there who doesn’t love a delicious blueberry muffin? And how about if it happened to be gluten-free, protein-rich, etc. Here’s the deal:

Each muffin has just over 7 grams of protein which will help fill you up, keep blood sugars stable and support a healthy metabolism. I’ve made them with almonds which are kind to the digestive system and won’t blow you out. The  rich colour from blueberries comes from anthocyanins that are antioxidants which neutralize free radicals.

INGREDIENTS (makes 12 muffins)

300 g (10 ½ oz/3 cups) almond meal
2 teaspoons gluten-free baking powder or ½ teaspoon baking soda
4 organic eggs
60 ml (2 fl oz/¼ cup) macadamia nut oil, cold pressed coconut oil or extra virgin olive oil
1 teaspoon ground cinnamon
2 tablespoons raw honey, organic maple syrup or a few drops stevia if needed
1 red apple, chopped into small chunks with the skin on
200 g (about one cup, the amount doesn’t have to be spot-on) fresh or frozen blueberries

METHOD

  1. Preheat the oven to 170°C / 300 F.
  2. Combine the almond meal and baking powder in a large mixing bowl.
  3. Add the eggs, oil, cinnamon and honey to form a batter.
  4. Fold in the apple and blueberries.
  5. Divide into paper-lined muffin tins.
  6. Bake for 35–40 minutes until cooked through and golden.

And some bonus information!

For nut free muffins use ¼ cup coconut flour (40 g)  + 2 tablespoons of organic pea protein in place of the 3 cups of almond meal – reduce the baking powder to 1 good teaspoon – reduce the blueberries to 100 g. If the mix looks a little wet – add a touch more coconut flour or Pea Protein. This recipe makes 6 large muffins or 12 cupcake sized muffins.

Hazelnut meal also works really well  with this recipe and marries perfectly with the apple and blueberries.

Let me know how you and your family like these yummy, yummy muffins!

39107_182

RECIPE: DIY Stevia Extract

29 Thursday Sep 2016

Posted by Cassandra Carr in Recipes

≈ Leave a comment

RECIPE: DIY Stevia Extract

stevia-extract-992x1024

Note: This recipe is taken from New Life On a Homestead.com

You’ll need a fair amount of leaves to get any goodly amount of extract. If you have one small plant, it might not bear much. If you have a larger one, closer to a bush, like mine, or several plants, you should be fine.

Step 1: Take the leaves off the plant and wash them. Hopefully this step is self-explanatory, but just in case it’s not…fill your sink with cold water and swish the leaves around in it. Drain the sink and then repeat the process with more cold water.

stevia-extract-5-1024x766

WASH THE LEAVES!

Step 2: Discard the stems of the leaves and use a salad spinner (I like this one) to remove as much water or other excess moisture as is possible. At this time you can also remove any leaves that are brown, etc that you may have missed before. If the leaves have a few brown spots, don’t worry about it.

stevia-extract-4-1024x766

Step 3: In a medium sized pot, get 2 cups of water almost to a boil. Be sure not to bring it to a full boil, as this can damage the Stevia. Add 1 cup of slightly bruised leaves (they will probably be bruised already from the washing and spinning if you go through those steps), and remove the pot from the heat. Cover, and allow to steep for about an hour.

stevia-extract-3-1024x766

Step 4: Using a coffee filter (a permanent one works best and lots of us have Keurigs so this works well), strain the liquid into a clean container. It’ll be a nice, greenish color.

stevia-extract-2-1024x766

Store your Stevia extract in a lockable glass container in the fridge for up to 2 weeks. It’s recommended that you store the extract in a dark container, but I didn’t have one so I put my jar in a brown paper bag instead.

Before putting my finished product up, we all tasted a sample of it. Whew, was it SWEET!

Need recipe ideas for stevia extract? Try here: Mother Earth News – there’s no need to buy the book of recipes, as the page contains several. Additionally, Pinterest (shocking, huh?) has a ton of recipes. Try searching for “Stevia recipes”.

35610_10000115

DON’T FORGET! My novella releases today!

RECIPE: Chocolate Strawberry Smoothie (that your kids will love!)

22 Thursday Sep 2016

Posted by Cassandra Carr in Recipes

≈ Leave a comment

RECIPE: Chocolate Strawberry Smoothie

dark-chococolate-strawberry-smoothie

If you make smoothies for yourself in the morning, try this one. And I bet you can convince your kids to have a sip or ten, too! Strawberries? Chocolate? What’s not to love?
Dark chocolate, creamy greek yogurt, and sweet strawberries are the perfect combination in this frosty heart healthy Dark Chocolate Strawberry Smoothie!
Author: Kaleigh McMordie
Recipe Type: Smoothie, Breakfast, Snack, Dessert
Serves: 2
Ingredients
  • ½ cup nonfat or lowfat strawberry Greek yogurt
  • ¾ cup frozen strawberries
  • 1 cup skim milk (or milk of choice)
  • 1 tablespoon unsweetened dark cocoa powder
  • ½ cup ice (only if using fresh berries)
Instructions
  1. Place all ingredients in a blender (or Bullet, food processor, etc.) and blend until smooth.
  2. Pour into a glass and top with sliced fresh strawberries, if desired. Enjoy immediately!

NOTE: When you make this smoothie, be sure to use frozen strawberries to get the thick and frosty consistency without needing to add ice. If you only have fresh berries on hand, add about 1/2 cup of ice so that you can get the perfect thickness.

lego_logo_120x60

After you drink your delicious smoothies, try sharpening your child’s imagination with some Legos! My husband is a “collector”, in that he has boxes and boxes of every size and shape imaginable. We’ve purchased a bunch of the Lego Friends sets made for girls, and my daughter and my husband will sit there for a couple of hours making up entire cities. I believe this has enhanced not only her imagination, but her fine motor skills too.

RECIPE: Do-It-Yourself Hand Sanitizer

15 Thursday Sep 2016

Posted by Cassandra Carr in Recipes

≈ Leave a comment

RECIPE: Do-It-Yourself Hand Sanitizer

essential-oil-antiseptic-spray1

I don’t know about you, but I’m not a big fan of the hand sanitizers sold in stores today. There seems to be a lot of chemicals I don’t want on my daughter’s hands, plus I do agree with the notion the more we use these antibacterial soaps and such, the stronger the bugs will become.

essential-oil-antiseptic-spray-21

Supplies

  • 1 tablespoon witch hazel
  • 2 teaspoons pure aloe vera gel
  • 2 teaspoons vitamin E oil
  • 10 drops each: lavender, tea tree, and frankincense essential oils
  • Filtered water

Instructions

Combine witch hazel, aloe, vitamin e oil, and essential oils in a measuring cup with a spout. Transfer to a small spray bottle. Add enough filtered water to fill almost fill it, leaving a little space at the top. Shake well before each application.

Note: I used aloe vera gel that includes other ingredients; 100% aloe gel liquid can also be used, though the spray will be a little thinner.

This recipe was originally taken from http://helloglow.co/diy-hand-sanitizer-antiseptic-skin-spray-lavender-aloe/.


I’m excited to make more of this. It’s a useful product and I feel so much better knowing my child is using natural things rather than yet more chemicals.

308x211_dscm_logo

RECIPE: Homemade Baby Shampoo and Wash

08 Thursday Sep 2016

Posted by Cassandra Carr in Recipes

≈ Leave a comment

RECIPE: Homemade Baby Shampoo and Wash

diy-natural-baby-shampoo

This recipe is so easy! Now, before you say “But Johnson & Johnson (or other company) makes such a good product, consider this. There are only three ingredients in this, and one of them is water. Another is essential oil. Castile soap is very gentle.

e02c3f0b375cf7cc94ec4a3d3cb7d94e

This is the Dr. Bronner’s brand, which is my personal favorite. There are others, but this one is pretty commonly regarded in “homemade” and “organic” circles as the best.

Here are the directions:

Homemade Organic Baby Wash

1 1/2C Distilled Water
1/4 C Castile Soap
A Few drops of essential oil (lavender, lemon, orange, etc)
Foaming Soap Dispenser (16oz)

Mix it up and done. Wasn’t that easy? And now you know exactly what you’re using to keep your baby clean.

This is a short post, I know, but since it’s been about two weeks since I put up anything new, I figured better a short post than nothing.

dd14accf9f47151d9fb5e69652f89a51

Look at that face! I want the best for my child, who’s no longer a baby, and I do everything I can to make sure she stays healthy. One of those things involves keeping harsh, potentially harmful chemicals out of the house.

41074_10

← Older posts
Newer posts →

Social Media

  • View ChronicIllnessWarriorsBlog’s profile on Facebook
  • View Cassandra_Carr’s profile on Twitter
  • View BooksbyCassCarr’s profile on Pinterest

Recent Posts

  • MY LIFE: Depression is a b*tch
  • RESOURCES: 20 snacks to curb cravings
  • GO NATURAL: Top 5 natural gargle recipes & tips for a sore throat
  • RECIPE: Paleo Pumpkin Coffee Cake – healthy, easy, and delicious!
  • GO NATURAL: 18 best essential oils for nerve pain

Archives

Enter your email address to follow this blog and receive notifications of new posts by email.

Join 313 other subscribers
Follow The Chronic Illness Warriors on WordPress.com

Chronic Illness Warriors FB Group

Chronic Illness Warriors FB Group

Check out my jewelry!

Blog at WordPress.com.

Privacy & Cookies: This site uses cookies. By continuing to use this website, you agree to their use.
To find out more, including how to control cookies, see here: Cookie Policy
  • Subscribe Subscribed
    • The Chronic Illness Warriors
    • Join 66 other subscribers
    • Already have a WordPress.com account? Log in now.
    • The Chronic Illness Warriors
    • Subscribe Subscribed
    • Sign up
    • Log in
    • Report this content
    • View site in Reader
    • Manage subscriptions
    • Collapse this bar
 

Loading Comments...